Get Help

Creating a Transcribed Corpus
Sometimes when creating a corpus, you may elect to transcribe audio or video to text to analyze. Transcription can be done manually, or using tools to assist and speed up the transcription process. See below for guidance on how to transcribe for free using Word for Web.
With all transcription tools, it is important to understand that these tools are imperfect and often have issues transcribing accents or dialects, which can perpetuate linguistic bias. Additionally, the human transcribing the text can insert their own biases into the data. See the articles below for more information on ensuring accurate and efficient transcription:
-
Accent-induced bias in linguistic transcriptionsby Marjoleine Sloos, Andrea Ariza García, Alexandra Andersson, and Mathea Neijmeijer (Language Sciences)
-
Can machines compete with humans in transcribing audio? A case study using sermons from U.S. religious servicesby Athena Chapekis (Pew Research Center)
-
Did they really say that? An agential realist approach to using computer assisted transcription software in qualitative data analysisby Nicholas Jenkins, Karen Monaghan, and Michael Smith (International Journal of Social Research Methodology)
-
Speech Recognition Tech Is Yet Another Example of Biasby Claudia Lopez Lloreda (Scientific American)
Transcription Tools
Microsoft Word
Microsoft 365 offers 300 minutes of free audio transcription per month. Transcripts created can be edited and exported to a Word file format. This platform currently supports transcription of .mp4, .m4a, .mp3, and .wav files.
Notes:
-
A free Microsoft 365 license has been assigned to all members of the Georgetown community by UIS. No sign-up should be necessary, however, if you encounter access issues with your account, contact UIS for support. A guide for accessing Microsoft 365 via the university license can be found here.
-
Transcription services can only be accessed via Microsoft 365 or Word for Web in Microsoft Edge or Google Chrome. Transcription is not available on some versions Word desktop application that do not have Microsoft 365 (the version of Word installed on library computers does not have Microsoft 365). Please ensure you have downloaded and can access an appropriate version of Word or are in an appropriate browser for this tutorial.
Opening Word for Web:
- Go to georgetown1-my.sharepoint.com. Sign in via your Georgetown email address and complete all necessary SSO prompts. You may be required to do two-factor authentication via Microsoft Authenticator or another method.
- Create a new Word document by selecting “Add New” in the top left corner and selecting “Word document”.
- Word for Web should automatically open that new word document, however, you may need to manually select and open the file from the menu below.
Opening Microsoft 365:
- Open the Word application on your computer by double-clicking the icon.
- Click Home -> Account on the left side pane to view your account and product information. Ensure you are logged in and that the version of Word you are using has Microsoft 365.
Steps for Transcription:
-
In the top right, select the arrow next to “Dictate”, and then select “Transcribe”.
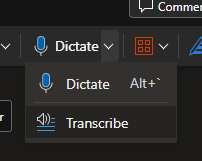
This will open the transcription window. Note: at the bottom of this window, you can track how many minutes of free transcription you have used so far this month.
-
Click “Upload audio” and select the file you wish to transcribe.
-
Wait for transcription - this may take a few minutes to load.
-
Review the transcription in the pane that appears. You can click the pen icon that appears when you hover over sections of the transcription to edit text and add speaker names.
-
Click “Add to document” to move the transcript to a Word document. You can select to move just text, or add in speaker names and timestamps.
-
Once your transcript has been moved to Word, you can edit and adjust it using the Word interface. You can also click "File" and "Save As" to select a location in OneDrive to save your transcript file, or to download a copy to edit locally via the Word desktop application.
noScribe
noScribe is an AI-based software for transcription that runs locally on your computer, with support for 60+ languages.
noScribe is free and open-source for anyone to install on their computer from their GitHub site, however, it does require newer hardware and memory space to run efficiently, as it is a large software. noScribe is available to use on ISIDORE, the library's data computer, by reservation.